Raspberry Pi Night Vision Camera Hack
See in the dark with this ingenius night vision camera hack!

This guide (which is also featured over on Cyntech’s blog) will show you how to use the Lisiparoi camera add-on to create a Raspberry Pi night vision camera using Cyntech’s very affordable Model B case.
Raspberry Pi Night Vision Camera Hack
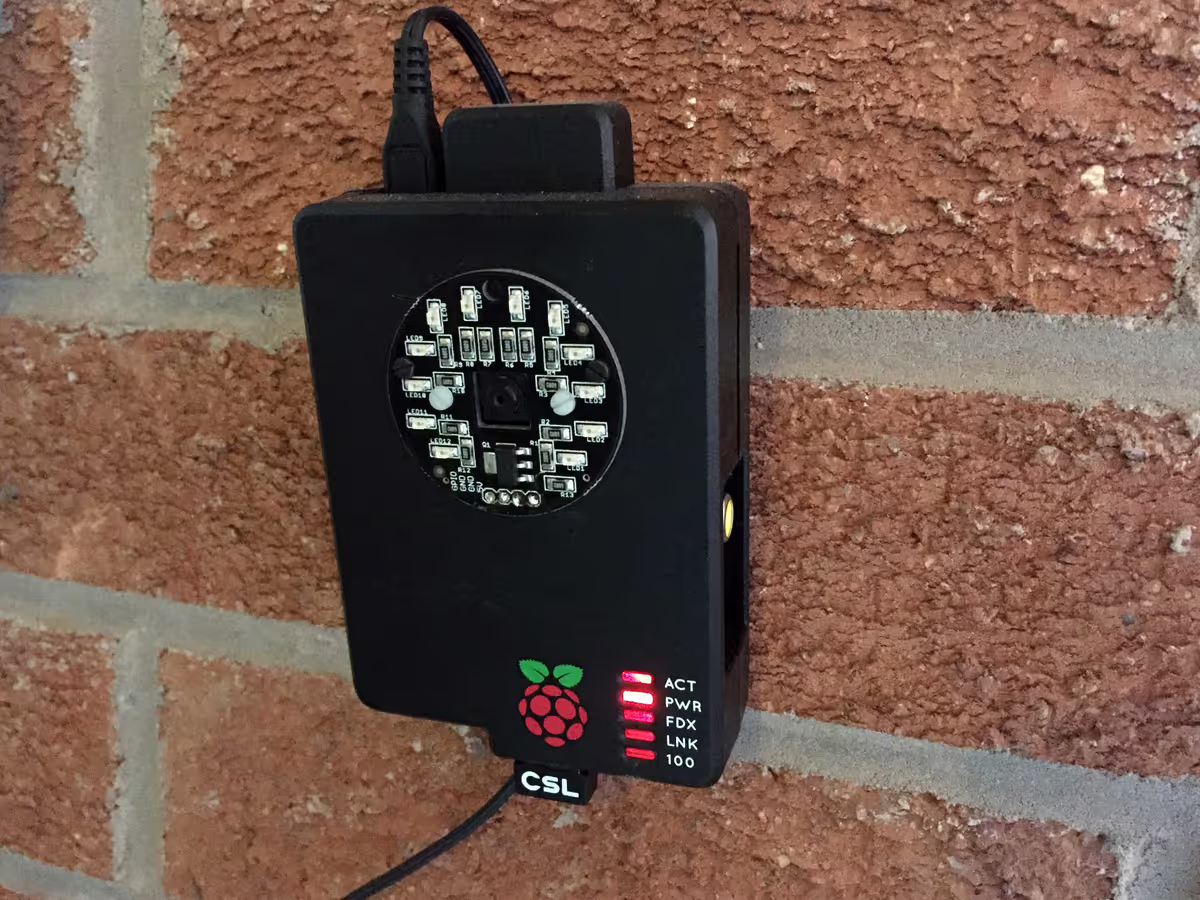
If like me, you are an early adopter of the Raspberry Pi and have bought the new models as they are released, you probably have a surplus of older Model B’s lying about at home. It would be a crime to let them go to waste, so why not turn them into a self-enclosed Raspberry Pi Night Vision Camera? I recently bought Jason Barnett’s (also known as Boeeerb on Twitter) nifty little Lisiparoi – a light source add-on for the Raspberry Pi Camera Module (including infra-red) – and I wanted to use this as part of a home-made CCTV setup. I also had a couple of Cyntech’s Berry Black cases (for the Model B Pi) at home, and seeing as they are cheap as chips, I decided I would have a go at modding one of my cases to incorporate the Lisiparoi and Camera Module all-in-one.
For my first attempt, I am very pleased with the result. Looking at the completed project, you could never tell I hacked this case using nothing more than a pencil, a drill, my wife’s nail file (shhh) and a sharp knife!
Parts used:
For my Raspberry Pi Night Vision Camera, I used the following parts:
- Raspberry Pi Model B
- Cyntech Berry Black Case (or any other colour)
- Lisiparoi Camera Add-On (IR version for this, but works with the normal version too)
- USB WiFi Adapter
- Raspberry Pi Camera Module (No-IR used, but works with normal version)
- Suitable power supply
Time required:
30 to 60 minutes, but take your time where needed especially when using sharp tools!
Tools required:
- Drill and small drill bit (1mm or 2mm is an ideal size)
- Small file (I used a metal nail file)
- Pencil
- Sharp knife (craft or Stanley knife)
Instructions:
Making your Raspberry Pi Night Vision Camera is relatively simple, but hopefully this step-by-step guide will make it even easier:
- Place the Lisiparoi on the Berry Black case in the place you want it – make sure you allow enough room around the outside so it is not too close to the edge. Draw around the Lisiparoi with a pencil – this will be our reference point so we can work out where to start drilling and filing. Take a look at my photo for reference:

Measuring up before cutting - We will need to cut out a few points in our case – we’ll need to allow a space for the headers (so we can connect the Lisiparoi to the Raspberry Pi’s GPIOs), and a square hole for the Raspberry Pi Camera Module. We’ll also need to drill small holes for the nuts and bolts to secure the Lisiparoi to the case. All of this will involve a little trial and error, but remember – you can always cut more, but cannot put back what you’ve removed!
- Start with the mounting holes – I did this by simply placing my Lisiparoi on the case in the place I wanted it, and then carefully drilled through the case using the holes in the Lisiparoi as a template. We can refer to these holes when marking out the holes for the camera module and for the headers.
- You should now have two small holes in your Berry Black case and a pencilled outline of your Lisiparoi. We can now drill small holes for the header – if you take a look at my photo, you can see that the header holes are a few millimetres away from the bottom edge of the Lisiparoi – again start small and increase the size of the holes as you go along (if needed) – it doesn’t have to be exact, millimetre accurate hole as your Lisiparoi will hide everything once in place.
- Drill more holes to the approximate width of the Lisiparoi header, and then use a small file to square-off the hole, fine tuning it by checking with the header in place until it fits nicely.
- Now we need to cut a hole for the Raspberry Pi Night Vision Camera Module to fit through. I drew around the module (in the same way I did with the Lisiparoi) to mark the dimensions, and then drilled several holes ON THE INSIDE EDGE OF THE OUTLINE (otherwise the hole will be too big) – this will make cutting out the hole a lot easier! This is what mine looked like after I cut out all the holes.

Holes for the Camera and Lisiparoi have been cut out - I then CAREFULLY used my sharp knife to cut out the hole – it doesn’t need to be surgically neat, as we’ll file it down later.
- Once the camera module hole has been cut out, use the small file to square-off the hole again, checking that everything fits nicely.
- If you’re happy that everything fits nicely, it is now time to start assembling the case using the nuts and bolts provided, securing it to your case. If you haven’t soldered the headers onto your Lisiparoi, do this first but make sure you solder them so that they are on the inside of the case and pointing downwards so you can attach your jumper cables to your Raspberry Pi’s GPIOs once fully assembled.
- Connect all your cables, including the ribbon cable for your camera module, and then screw the lid on your case and then you’re done!
Example image
Below you can see an example of the image captured by the No-IR camera with the IR light source from the Lisiparoi.
Day

Night

As you can see, it’s not fantastic unless the object is close but with an external 12v IR LED light source, it would be great.
Software quick-start:
For the purpose of this guide, we’ll be using MotionEyeOS (formerly MotionPie) to create our Raspberry Pi Night Vision Camera, as it is very slick, purpose-built and well supported. First thing you’ll need to do is download the image file from their GitHub site but make sure you pick the one relevant to your model Pi first.
Once downloaded, write the image to your SD card (plenty of guides available for this, so won’t cover that in here) and then pop it into your Pi. Before you fire it up, make sure you have an Ethernet cable connected to your Pi first as we’ll need to connect to the Pi to enable WiFi and connect to your network.
The first boot usually takes slightly longer than normal as MotionEyeOS, but when it’s all done you will need to access the interface via your preferred web browser. By default, MotionEyeOS uses port 80 so this means you only need to enter your Pi’s IP address in your browser and you should then be presented with the login page. There are a number of ways to find your Pi’s IP address, but I prefer using a Windows-based programme called Advanced IP Scanner as this is simple and quick to use. You can download it for free from their website.
When you find yourself at the MotionEyeOS login screen, the default username is ‘admin’ and the password is blank. You can change this in the settings yourself if you wish. If you don’t see the login screen, click on the little key icon in the top-left corner.
Again, I won’t go into too much detail on the configuration here, as there is a great wiki page on their site, but in essence you will need to make sure your camera has been added and configured the Pi to use WiFi (including adding your SSID and password). You can overclock the Pi, tweak the camera resolution and much more. One big piece of advice I’d give is that once you are happy with your setup, make a backup of your settings (from within MotionEyeOS) and keep this somewhere safe. Therefore, if you need to do a reinstall, you only need to be able to login to MotionEyeOS to restore your settings from your backup. Very handy!
Once you are happy with your setup, you should have a fully-working, Raspberry Pi Night Vision camera! I connected my Lisiparoi so that when the Pi is powered, so will the Lisiparoi. However, you can add more sophisticated methods for this if you wish (i.e. via a button or GPIO control) – check out the Lisiparoi setup guide for more details on this.


